 This blue swan was in mothers things and I think it may have been my grandmothers. There are no marks on it at all. It may be some sort of pottery or china. Maybe a candy dish or soap dish or for jewelry or pins.
Thursday, August 30, 2012
Blue Swan
This blue swan was in mothers things and I think it may have been my grandmothers. There are no marks on it at all. It may be some sort of pottery or china. Maybe a candy dish or soap dish or for jewelry or pins.Balance - rest - mindfulness. And a competition.
Climbers I have just returned from a family holiday in Bali. Again. And I'm not entirely happy about it. Returning that is.However,while I was there I dropped in to Ubud Adventure, across the road from my sumptuous accommodation at De Ubud Villas. More on that later.There's no rock climbing to speak of in Bali, but the trekking is absolutely spectacular. So you'll need gear.
 Win this T-Shirt from Ubud Adventure.
Just become a follower of jjobrienclimbing, leave a comment on this post, and check your letter box for your new T-Shirt.
First, you need a google account to become a follower.
Then scroll down the right side of this page to where it says "Follow" and join. Easy.
The rules:
The winning comment will make me laugh, impress me, or make me weak with pity. Or all three.
Your chances of winning are good.
I've only got 10 google followers and at least half of them don't want a T-Shirt. I'll give you a week, or so.
 Ubud Adventure stockthe Indonesian Consina range of gear.
Packs, T-Shirts (like the one above), clothes, tents.

Madé and Sudantilook after the store.
They are so delightful.
If I had a shop I'd poach them.


Sudanti with the range of packs.Hundreds of them.Cheap.
Look for the big sign down the end of Hanoman st.where it swings in toward the Monkey Forest.
Ah, back to the Villa.
 I think Willow sums up the mood of the holiday here, relaxing in the poolside balé.
 Sandra and Lotus at one of our fav restaurants, Casa Luna.
The extended fam. On the walk from Bentuyung to Ubud.
10 days. No climbing.Just cafes.Attending the Legong dancing at the palace, three times, I love it.Hanging with the family.
 Q. Did you visit any agricultural areas during your visit?A. Um.....No?Q. Are you bringing in any more than $10,000.00 in cash?A. Are you kidding, have you seen how my family can shop?

 We did a photo shoot for the Red Phoenix range of Jewellery and clothing while we were at the Villa.
Willow wearing "Black Jewels" necklace from the Red Phoenix range.
 Lotus wears the "Batik Bella" shift and "Limoncello" necklace both from the Red Phoenix,Dolce Vita collection available from The TribuneLocation: Ku De Ta, Seminyak, Bali.
 Climbers, I'll come clean. I didn't climb Agung this time, but here's a couple of shots from my last climb a year ago.
  Mt. Agung - 10,300 ft or there abouts. It's steep, high, freezing cold, it smolders with sulphurand probably my very favourite place.
 I've walked along this ridge a few times over the years. The path from Bentuyung, down to Ubud, through padi, deep dark gorges on either side.
I have often stopped and wondered how thevillage priestsdecide where to place the small shines that can be seen everywhere. Shrines to Dewi Sri, Goddess of the rice. I know the placement is important, but what is it about a particular place that makes it important?
Back at my forest home in Australia, one night, I dreamt that I could see the subtle energy that gives power to place. It was so effortless and obvious.
I felt fresh and strong. It reminds me to stay aware of subtlety as I hammer my way through the day.
Forbidden East West Traverse ..
EPIC!
Part I
"The Summit"
The original plan was to climb Forbidden Peak as an east to west traverse so that we could climb the west ridge and avoid the late season difficulties associated with it. We got a late start in Washington Pass and packed up slowly and did some sight seeing. We ate lunch in Marblemount and finally got under way. As soon as we were hiking the Boston Basin bushwhack, I mean trail, we knew what we were getting into. It turns out we were both fairly tired from climbing South Early Winter Spire the day before and we were feeling it.
 Sorting gear for Forbidden (photo by Steve Machuga)
On the way in we passed Josh and Matt who were coming down from a climb of the Direct East Ridge. We chatted a bit and got beta for the descent of the East Ledges. It was probably there that I made the decision in my head that we would probably only do the east ridge and then descend the ledges although I may not have expressed it to Steve at that time. After chatting a bit we continued on and discussed the option of descending the ledges. After some difficult water crossings in the basin, we were finally in the upper basin and setting up camp three hours after we left the car.
We pumped some water from a nice stream, and made dinner. We prepped for the next day and decided on a wake up time of 5:30am. (Josh and Matt had told us they left camp at 5:30.) We had a bit of difficulty getting to sleep because we kept thinking we were hearing female voices. This may have been true as another tent was there in the morning (About 100m downhill from our location) that wasn't there when we went to bed.
Just before the alarm went off there was some rock/ice fall on the mountain. I jumped up to make sure we were not in danger. My commotion woke Steve up and he promptly went back to sleep. I hadn't been sleeping well and mulled about in my sleeping bag for the next 15 minutes until the alarm went off. Once the alarms went off, Steve and I decided to rest in another 15 minutes or so before actually getting out of the tent. [Can you already count the many signs of an epic?] We ate breakfast, used the toilet and left camp at 6:30am.
We had good information from Josh and Matt about the problem they had on the approach and made quick time up the slabs to the snow and eventually the gully. We arrived at the notch at the base of the route around 8:30 or so. In keeping with the epic theme, we dawdled at the base for some time (including Steve needing another "bathroom break" before starting the route.) During our delay we made the decision not to down climb the west ridge. We knew we were both tired and we weren't moving that fast coming up from camp.
We eventually started climbing at 10am and I took the first lead. The first bits were 3rd class and then it got somewhat harder where I had to negotiate a few small gendarmes. Since good protection was scarce, I looked for a viable anchor location after I had about half the rope out. I wound up slightly off the crest of the ridge on the south side and was probably slightly off route. Steve made his way over to me and then slowly made about leading the next pitch.
Steve had to regain the ridge crest first and then make his way up the first significant gendarme on the ridge. This section is listed at 5.7 in the guides and that would probably be correct. It was slow going as route finding was not obvious, but more so because protection was difficult. Once finding an suitable anchor location, Steve brought me up. Two hours had passed since we started climbing and I knew that we were in for a long day. Being the optimist, I thought our speed would improve now that we got a feel for the climbing and we were back on route. So we continued on.
 Following the second pitch (photo by Steve Machuga)
I led a short exposed pitch along the ridge crest with easy climbing before I got to and area that looked like it may be difficult to find an anchor in. So I went with the option I had present. (Which still felt pretty desperate to me.) I brought Steve over and we discussed the next pitch. We were a short distance from the next major gendarme which can be bypassed on the north side of the ridge. Steve led off around some minor obstacles before taking a path of least resistance on the north side of the ridge. After using up all the rope, I began to simul climb behind him as we both wound up north of the ridge proper. We continued to climb on the north side for some distance on loose dirty ledges until Steve hit a spot where he could build a reliable belay. He then belayed me to his location.
I started out on the second leg of this traverse over a rib and onto more slab like terrain heading for the notch between the last two gendarmes. It seemed we were a bit low and as I headed back up, the terrain was better for climbing and protecting. I could see I wouldn't make it to the notch in one rope, so when Steve told me I had used half the rope, I built a suitable anchor. He then led off to the notch on a full rope length and brought me up. Having looked at the rap on top of the last gendarme, I can say I am glad we decided to bypass it. (Scary overhanging rappel off a rock horn.)
 Climbing up to the notch (photo by Steve Machuga)
Anchor options weren't great at the notch, and it took Steve a long while to build an anchor using a few pieces and a few natural options. This was the crux overhanging 5.8 step. I had already told him he was leading it, so we switched positions and he headed out. The step looked scary and Steve had a hard time believing it went the way it did. He tried to scope out other alternatives to it, but then faced the fact that it did go up that steeply. Steve confidently led up the steep face and began to look for a suitable belay anchor. (I told him it better be solid before starting the pitch.) He went a bit further before he built an anchor. I climbed the steep section which was pretty wild, but easier than it looked. Although it had a very funky move where you had to stand on a wobbly block in order to make a move. After reaching the belay, I was off again.
 Topping out on the 5.8 (photo by Steve Machuga)
I led out a bit on what is supposed to be 5.2 terrain to the summit. It was mostly on the crest and upon approaching a minor step, with a sling on top, I set up a belay. (I mistook that to be the summit, but was unsure.) I brought Steve up to my location and he led out for the summit.
 My last lead up the East Ridge (photo by Steve Machuga)
He reached the summit and set up and anchor to belay me up. I joined him at the summit around 7pm. Clouds were blowing up out of Boston Basin and blowing down the north side of the mountain. There was the smell of smoke. (We presumed the clouds were related to forest fires.) The wind was cold and we snapped a few pics before rapidly going about the rappels...
 Summit shot (photo by Steve Machuga)
My photos are here.
Part I
"The Summit"
The original plan was to climb Forbidden Peak as an east to west traverse so that we could climb the west ridge and avoid the late season difficulties associated with it. We got a late start in Washington Pass and packed up slowly and did some sight seeing. We ate lunch in Marblemount and finally got under way. As soon as we were hiking the Boston Basin bushwhack, I mean trail, we knew what we were getting into. It turns out we were both fairly tired from climbing South Early Winter Spire the day before and we were feeling it.
Sorting gear for Forbidden (photo by Steve Machuga)On the way in we passed Josh and Matt who were coming down from a climb of the Direct East Ridge. We chatted a bit and got beta for the descent of the East Ledges. It was probably there that I made the decision in my head that we would probably only do the east ridge and then descend the ledges although I may not have expressed it to Steve at that time. After chatting a bit we continued on and discussed the option of descending the ledges. After some difficult water crossings in the basin, we were finally in the upper basin and setting up camp three hours after we left the car.
We pumped some water from a nice stream, and made dinner. We prepped for the next day and decided on a wake up time of 5:30am. (Josh and Matt had told us they left camp at 5:30.) We had a bit of difficulty getting to sleep because we kept thinking we were hearing female voices. This may have been true as another tent was there in the morning (About 100m downhill from our location) that wasn't there when we went to bed.
Just before the alarm went off there was some rock/ice fall on the mountain. I jumped up to make sure we were not in danger. My commotion woke Steve up and he promptly went back to sleep. I hadn't been sleeping well and mulled about in my sleeping bag for the next 15 minutes until the alarm went off. Once the alarms went off, Steve and I decided to rest in another 15 minutes or so before actually getting out of the tent. [Can you already count the many signs of an epic?] We ate breakfast, used the toilet and left camp at 6:30am.
We had good information from Josh and Matt about the problem they had on the approach and made quick time up the slabs to the snow and eventually the gully. We arrived at the notch at the base of the route around 8:30 or so. In keeping with the epic theme, we dawdled at the base for some time (including Steve needing another "bathroom break" before starting the route.) During our delay we made the decision not to down climb the west ridge. We knew we were both tired and we weren't moving that fast coming up from camp.
We eventually started climbing at 10am and I took the first lead. The first bits were 3rd class and then it got somewhat harder where I had to negotiate a few small gendarmes. Since good protection was scarce, I looked for a viable anchor location after I had about half the rope out. I wound up slightly off the crest of the ridge on the south side and was probably slightly off route. Steve made his way over to me and then slowly made about leading the next pitch.
Steve had to regain the ridge crest first and then make his way up the first significant gendarme on the ridge. This section is listed at 5.7 in the guides and that would probably be correct. It was slow going as route finding was not obvious, but more so because protection was difficult. Once finding an suitable anchor location, Steve brought me up. Two hours had passed since we started climbing and I knew that we were in for a long day. Being the optimist, I thought our speed would improve now that we got a feel for the climbing and we were back on route. So we continued on.
Following the second pitch (photo by Steve Machuga)I led a short exposed pitch along the ridge crest with easy climbing before I got to and area that looked like it may be difficult to find an anchor in. So I went with the option I had present. (Which still felt pretty desperate to me.) I brought Steve over and we discussed the next pitch. We were a short distance from the next major gendarme which can be bypassed on the north side of the ridge. Steve led off around some minor obstacles before taking a path of least resistance on the north side of the ridge. After using up all the rope, I began to simul climb behind him as we both wound up north of the ridge proper. We continued to climb on the north side for some distance on loose dirty ledges until Steve hit a spot where he could build a reliable belay. He then belayed me to his location.
I started out on the second leg of this traverse over a rib and onto more slab like terrain heading for the notch between the last two gendarmes. It seemed we were a bit low and as I headed back up, the terrain was better for climbing and protecting. I could see I wouldn't make it to the notch in one rope, so when Steve told me I had used half the rope, I built a suitable anchor. He then led off to the notch on a full rope length and brought me up. Having looked at the rap on top of the last gendarme, I can say I am glad we decided to bypass it. (Scary overhanging rappel off a rock horn.)
Climbing up to the notch (photo by Steve Machuga)Anchor options weren't great at the notch, and it took Steve a long while to build an anchor using a few pieces and a few natural options. This was the crux overhanging 5.8 step. I had already told him he was leading it, so we switched positions and he headed out. The step looked scary and Steve had a hard time believing it went the way it did. He tried to scope out other alternatives to it, but then faced the fact that it did go up that steeply. Steve confidently led up the steep face and began to look for a suitable belay anchor. (I told him it better be solid before starting the pitch.) He went a bit further before he built an anchor. I climbed the steep section which was pretty wild, but easier than it looked. Although it had a very funky move where you had to stand on a wobbly block in order to make a move. After reaching the belay, I was off again.
Topping out on the 5.8 (photo by Steve Machuga)I led out a bit on what is supposed to be 5.2 terrain to the summit. It was mostly on the crest and upon approaching a minor step, with a sling on top, I set up a belay. (I mistook that to be the summit, but was unsure.) I brought Steve up to my location and he led out for the summit.
My last lead up the East Ridge (photo by Steve Machuga)He reached the summit and set up and anchor to belay me up. I joined him at the summit around 7pm. Clouds were blowing up out of Boston Basin and blowing down the north side of the mountain. There was the smell of smoke. (We presumed the clouds were related to forest fires.) The wind was cold and we snapped a few pics before rapidly going about the rappels...
Summit shot (photo by Steve Machuga)My photos are here.
Tuesday, August 28, 2012
Ice Land

Here is another wildly cool ice formation that we found on Artist's Point on Saturday. I loved the lines here and could not resist pointing my camera in their direction!
Monday, August 20, 2012
Whiston - Cogenhoe - Brafield - Denton - Whiston
8 miles. Barry, Eddie, Maureen, Gordon.
 Down the hill from Whiston to Whiston Lock on the Nene. The couple going through with their boat had spent one month travelling back to Oundle from Bath. The water was pretty choked with weed, and the gates were difficult to close. Some weed has been raked out and left on the path at the side.From there we walked along the Nene Way by the river as far as Cogenhoe Mill, then up into the village itself.
 The path emerges into Cogenhoe near Mill House
 Chickens and Indian runner ducks (?) by the playing field in Cogenhoe. We took the footpath towards Brafield on the Green.
 St Laurence's church at Brafield. From Brafield we took the path behind the church and made our way to Denton,, across some ploughed fields, and on one occasion we needed the machete.
 Through the hedge, and onward.
 Denton.
 Free range chickens between Denton and Whiston
 Whiston church tower dominates this part of the Nene Valley, but is not, as far as we could see, easily accessed by car. It was built by the Catesby family, and is very much their monument.
 One of the Catesby cats inside the church.
 There are traces of some structure on the ground. I'm not sure what it is.
Down the hill from Whiston to Whiston Lock on the Nene. The couple going through with their boat had spent one month travelling back to Oundle from Bath. The water was pretty choked with weed, and the gates were difficult to close. Some weed has been raked out and left on the path at the side.From there we walked along the Nene Way by the river as far as Cogenhoe Mill, then up into the village itself.The path emerges into Cogenhoe near Mill HouseChickens and Indian runner ducks (?) by the playing field in Cogenhoe. We took the footpath towards Brafield on the Green.St Laurence's church at Brafield. From Brafield we took the path behind the church and made our way to Denton,, across some ploughed fields, and on one occasion we needed the machete.Through the hedge, and onward. Denton.Free range chickens between Denton and Whiston Whiston church tower dominates this part of the Nene Valley, but is not, as far as we could see, easily accessed by car. It was built by the Catesby family, and is very much their monument.One of the Catesby cats inside the church. There are traces of some structure on the ground. I'm not sure what it is. Sunday, August 19, 2012
Gardens & garden books
In March last year I wrote about attending the Alabama Master Gardener conference, where Lee May was the keynote speaker. (Don't ever pass up the chance to hear him speak - he's wonderful!)
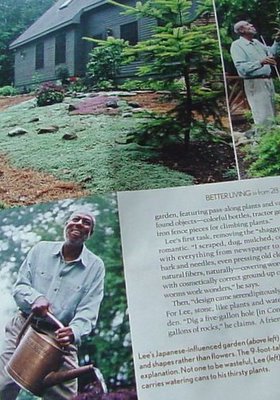
What a nice surprise to open the February .. issue of Better Homes and Gardens magazine, to find a feature article with several pages of pictures of his gardens. (Mine's a subscription, but I believe it is still on newsstands - go buy one to see the other pics.)
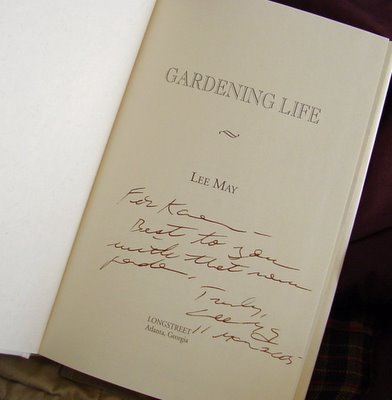
I probably should not admit that both of the lovely books he autographed for me are still sitting on my "to read" shelf. I have not found a lot of time for reading in the past year.
Of course that does not stop me from buying more books.
(As an aside, I believe bookstores that perpetrate placing impossible-to-remove stickers on book jackets should be punished. Severely.)
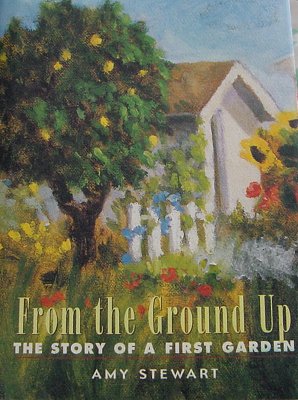
As far as I know, Lee May doesn't blog... but Amy Stewart does!
Hopefully both my garden-book reading and our actual garden will fare better this year than last.
We've come to the conclusion that we must install raised beds if we're going to be able to grow anything at all. Our beautiful vegetable garden spot apparently lacks any sort of drainage whatsoever. So when it rains heavily, like it has for the past two years, the veggies tend to sit in water for quite a while.

Hubby resisted the raised bed idea for a while, because it means no more driving around on the tractor in the garden. But I think it's inevitable.
Now, will we have the time and the energy to devote to this project? Stay tuned...

What a nice surprise to open the February .. issue of Better Homes and Gardens magazine, to find a feature article with several pages of pictures of his gardens. (Mine's a subscription, but I believe it is still on newsstands - go buy one to see the other pics.)

I probably should not admit that both of the lovely books he autographed for me are still sitting on my "to read" shelf. I have not found a lot of time for reading in the past year.
Of course that does not stop me from buying more books.

(As an aside, I believe bookstores that perpetrate placing impossible-to-remove stickers on book jackets should be punished. Severely.)
As far as I know, Lee May doesn't blog... but Amy Stewart does!
Hopefully both my garden-book reading and our actual garden will fare better this year than last.
We've come to the conclusion that we must install raised beds if we're going to be able to grow anything at all. Our beautiful vegetable garden spot apparently lacks any sort of drainage whatsoever. So when it rains heavily, like it has for the past two years, the veggies tend to sit in water for quite a while.
Hubby resisted the raised bed idea for a while, because it means no more driving around on the tractor in the garden. But I think it's inevitable.
Now, will we have the time and the energy to devote to this project? Stay tuned...
Thursday, August 16, 2012


Polar Circus Route Description - photo essay
Icefield's Parkway - Polar Circus
"Polar Circus is a popular and classic ice climb located in the Canadian Rockies off the Icefields Parkway. Climbers from throughout the world come to Canada to test their skills (and empty their bladders, sometimes unintentionally) on this incredible, 700 meter tiered frozen waterfall. Originally rated Grade VI, the first ascent of this route required eight days, fixed ropes, and substantial aid on the steepest sections. In what was to become a typical situation on this beautiful wall, the climb was crowded even during the first ascent, with two parties competing for the prize. The second ascent party, narrowly missing being the first to bag this great line, eliminated all but five meters of aid from the route. With the evolution of modern tools and techniques, "Circus" has since been downgraded to Grade V, WI5, and is typically climbed by competent teams in a long day from the Icefields Parkway."
With a 5 minute approach from the road this is one of the WI2+pitches that start up theCirrus Mtn Gully aka theCanadian water ice classic...."Polar Circus". Below: looking up the first of thethose early easy pitches in early Jan. conditions. The perfect warm up for the climbingto come. 1st step on the approach.

A bit more of easy climbing(appro. 200m) leads you to the first steep section of water ice. 2nd step on the approach below. And then yet some more rambling to get to the base of the first steep pitch on the route.

Below is going up the gully and turning right to start the first steep pitch. Chain and boltrap anchors on the right at the top of the pitch.

Below, looking down from the start of that pitch.

Polar Circus '80, in easy ice conditions...the first steep bit that blocks access to the upper gully. Depending on conditions any where from WI3+ to WI 4.

The same pitch in Feb and a bit steeper and more sustained.

Same pitch early Jan and much steeper than it first appears.

Late in the season,with safe avi conditionsand on warm, soft ice, Polar Circus can bean easy (WI4+/ 5-), and super classic one day ice climb. With an short approach and quick descent it is oneto go back to again and again.
The first snow section below:

Below is the last section of ice (WI2/3) before the snow gully and short ice steps below the Pencil.

On top of that pitch, again 1980 with bivy gear (the 80/81 winterseason turned Polar Circusfrom an over night climbto a one day route). This is atthe beginning of the long snow gully below the Pencil.

And the Pencil's snow gully below:


Below, turning the Pencil (which is obvious, directly above) on it's right hand side.

This is looking down the snow gully section just after turning the easy ice at the base of the Pencil which is on the right of this picture and just out of sight. Climber's right, then leftand up hill of this pictureis the avi prone slope.

Turning the Pencil just below and gaining the avi slope. Short bitsof up to WI4 and a lot of easy ice steps and easy snow terrain are below this. Spectacular position! The avi slope goes up and out to the right and then back left, up and then left again into the upper bowl above. That final level traverse back into the basin and the upper tiers can be really scary because of the sun exposure and snow conditions.
John Lauchlan in this picture and belowthearea where he was likelyswept away in an avalanche while trying to make the first solo ascent in the early winter of 1982.

Ray Jotterand photo 1979
The unformed Pencil's bottom stub.

Partially formed Pencil in early Jan.

Looking up from the firstright hand sectionof snow traverse above the Pencil. At the trees in the picture the track jogs back left, up and left againinto the huge upper bowl.

Below is the upper left hand traverse which can be a little spooky if the snow conditions are bad.
In thepicture below we are belaying the entire traverse..which is a new one for me. Likely we shouldn't have been there at all in those snow conditons. We made do.

Get there early while the traverseis still in the shade!
The last four pitches of the climb (or 3 rope stretching pitches with a 60 or 70mrope and some imagination) and for a strong party these might be the only pitchesyou rope up on in good conditions. In early Jan of '75 the first ascent partyclimbed 14 roped pitches of ice and taken 8 days up and down. Water fall climbing was stillnew and nothing this long or this cold had been done before. Charlie Porter, the Burgess Twins and Bugs McKeith were some of the most accomplished climbers of their generation at the time. The second ascent lead by Canadian, Laurie Skreslet, literally following in the 1st ascent teamsfoot steps, donein two days and all but the last short bit of itfree.
Huge admiration for both team'simagination,tenacity and skills. Ice climbing changed faster than anyone ever thought possiblebetween 1975 and 1980.
The upper bowl from lower on the route.

The upper bowl when you turnthe corner on the snow traverse. Good look at the first fun pitch on the first tier of the 3 uppertiers. The upper tiers are made up ofthis pitch (70M+), the Ribbon pitch and the final head wall of ice (2 pitches).

Below, the bivy cave used by allthe early ascents up to 1980.

Below, theRibbon pitch.

Difficulty on this pitch depends on the amount of ice some what but more importantly what time you get there, the temps and how wet the ice is. This pitch caneasily be running with water and nothing but rotten ice.

You are looking at entirelast set of tiers in this picture. The three climbers at the right side of the ice are at the base of the Ribbon pitch in fat, lateFeb '10 conditions.


Parts of the the last longpitch (or two short pitches)are shown here on the last tier. Fixed anchors on the right with a decent belay platform and rap chains. Climber here is on the last bit of steep ice and generally the crux of the route.

The final short pitch to finish the climb..steeper than it looks and generally sun rotted ice by the time you get on it. Perfect finish to a great climb! Picture is taken for the chained belay anchor and rap point.

For shortened view of the last tier. Chains on the rock are climber's right with a good ledge,one small stepabove the climber in the picture. The belay becomes pretty obviouswhen you are there. More so than in thispicture.

Looking back down the final pitch just below the last set of rap chains. Incredible piece of ice!

The always terrifing, free hanging rap off the Pencil on the way down. And not always the easiest rap station to find in the dark if it has been snowing. My suggestion is when in doubt "follow the water course" into thegully. You want thethird one on the far right. From the upper tier you walk to the first station(fixed pins and tat) that are on the left wall (looking down) where it narrows and steepens. The second setare fixed pins and tat again, this timeon the right hand side of the gully when facing down hill. The wrong gullies start outmuch steeper than the correct rap line. If it seems too weird and scary go north a gully...or two. You want teh tird gull on the north side of the bench.

A wonderful climb to be done over and over again just for the fun of it!
Polar Circus topo courtesy of Joe Palma copyright 2007
Some chainachors were replaced and new ones installed in the spring/fall of
Dbl click to enlarge the topo and check out the rap line, depending on conditions and daylightif might be a little confusing first time up the route.

Another topo here worth looking at as well:
http://lamountaineers.org/NAC/browserf/climbs/polarcir/topo.pdf
Gear Notes:
These days all but the lastrap anchorare bolts, fixed chains or pins and tat. You will rap straight over the Pencil so be careful there of you or your rope knocking anything down. 70m ropes are really much easier but 60m ropes will work as well. Take some tat for V threads but make sure someone hasn't beat you to it already. V threads get burried quicky on the upper pitches where you might need them so come prepared.
Be really careful on the avi slop above the Pencil...it has been fatal. It has three sections, a right hand traverse, a left hand traverse and short up hill and a final long left hand traverse which is a good sized slope show in the pictures above. A slides here will dump debrisinto the canyon below the Pencil.
Avi danger in particular on this route can be very high. Even small slidescoming out of the upper bowl while on the last 3 tiers will be serious.
Worth a look at the photos here:
http://www.pc.gc.ca/eng/pn-np/ab/banff/visit/visit7a12/visit7a12c-3/Polar%20Circus.aspx
and no the photos arenot photo shopped.....
A dozen screws should be plenty for anyone capable of finishing the climb. In good conditions plan on anywhere from 5 to 3 roped pitches depending on the length of your rope and a lot of easy ice either soloed or climbed together.
A early start will get you off before the south facing avi slopes heat up. Or better yet do it on a snowy, cloudy and cold day. You can avoid the avi danger and soft, rotten ice on the crux pitch if you do without the sun. Don't forget 3 or 4 long screws just for that rotten ice late in the day.
8 or 9 hrs round trip, car to car, these days is a reasonable time with good ice and snow conditions. 5 or 6 hrs of climbing. A hook fest on hammered out ice will make it quicker. A lot of snow to break trail through or really cold, new ice canmake it a "slightly" longer day.There is a reason the climb is rated a V for over all grade and time.
Approach Notes:
On a good day 10 minutes up a boot packed trail from the road. Cowboy-up and start on the first easy ice available instead of walking up the snow slope to the left and beginning of the first WI4 pitch.
"Polar Circus is a popular and classic ice climb located in the Canadian Rockies off the Icefields Parkway. Climbers from throughout the world come to Canada to test their skills (and empty their bladders, sometimes unintentionally) on this incredible, 700 meter tiered frozen waterfall. Originally rated Grade VI, the first ascent of this route required eight days, fixed ropes, and substantial aid on the steepest sections. In what was to become a typical situation on this beautiful wall, the climb was crowded even during the first ascent, with two parties competing for the prize. The second ascent party, narrowly missing being the first to bag this great line, eliminated all but five meters of aid from the route. With the evolution of modern tools and techniques, "Circus" has since been downgraded to Grade V, WI5, and is typically climbed by competent teams in a long day from the Icefields Parkway."
With a 5 minute approach from the road this is one of the WI2+pitches that start up theCirrus Mtn Gully aka theCanadian water ice classic...."Polar Circus". Below: looking up the first of thethose early easy pitches in early Jan. conditions. The perfect warm up for the climbingto come. 1st step on the approach.
A bit more of easy climbing(appro. 200m) leads you to the first steep section of water ice. 2nd step on the approach below. And then yet some more rambling to get to the base of the first steep pitch on the route.
Below is going up the gully and turning right to start the first steep pitch. Chain and boltrap anchors on the right at the top of the pitch.
Below, looking down from the start of that pitch.
Polar Circus '80, in easy ice conditions...the first steep bit that blocks access to the upper gully. Depending on conditions any where from WI3+ to WI 4.
The same pitch in Feb and a bit steeper and more sustained.
Same pitch early Jan and much steeper than it first appears.
Late in the season,with safe avi conditionsand on warm, soft ice, Polar Circus can bean easy (WI4+/ 5-), and super classic one day ice climb. With an short approach and quick descent it is oneto go back to again and again.
The first snow section below:
Below is the last section of ice (WI2/3) before the snow gully and short ice steps below the Pencil.
On top of that pitch, again 1980 with bivy gear (the 80/81 winterseason turned Polar Circusfrom an over night climbto a one day route). This is atthe beginning of the long snow gully below the Pencil.
And the Pencil's snow gully below:
Below, turning the Pencil (which is obvious, directly above) on it's right hand side.
This is looking down the snow gully section just after turning the easy ice at the base of the Pencil which is on the right of this picture and just out of sight. Climber's right, then leftand up hill of this pictureis the avi prone slope.
Turning the Pencil just below and gaining the avi slope. Short bitsof up to WI4 and a lot of easy ice steps and easy snow terrain are below this. Spectacular position! The avi slope goes up and out to the right and then back left, up and then left again into the upper bowl above. That final level traverse back into the basin and the upper tiers can be really scary because of the sun exposure and snow conditions.
John Lauchlan in this picture and belowthearea where he was likelyswept away in an avalanche while trying to make the first solo ascent in the early winter of 1982.
Ray Jotterand photo 1979
The unformed Pencil's bottom stub.
Partially formed Pencil in early Jan.
Looking up from the firstright hand sectionof snow traverse above the Pencil. At the trees in the picture the track jogs back left, up and left againinto the huge upper bowl.
Below is the upper left hand traverse which can be a little spooky if the snow conditions are bad.
In thepicture below we are belaying the entire traverse..which is a new one for me. Likely we shouldn't have been there at all in those snow conditons. We made do.
Get there early while the traverseis still in the shade!
The last four pitches of the climb (or 3 rope stretching pitches with a 60 or 70mrope and some imagination) and for a strong party these might be the only pitchesyou rope up on in good conditions. In early Jan of '75 the first ascent partyclimbed 14 roped pitches of ice and taken 8 days up and down. Water fall climbing was stillnew and nothing this long or this cold had been done before. Charlie Porter, the Burgess Twins and Bugs McKeith were some of the most accomplished climbers of their generation at the time. The second ascent lead by Canadian, Laurie Skreslet, literally following in the 1st ascent teamsfoot steps, donein two days and all but the last short bit of itfree.
Huge admiration for both team'simagination,tenacity and skills. Ice climbing changed faster than anyone ever thought possiblebetween 1975 and 1980.
The upper bowl from lower on the route.
The upper bowl when you turnthe corner on the snow traverse. Good look at the first fun pitch on the first tier of the 3 uppertiers. The upper tiers are made up ofthis pitch (70M+), the Ribbon pitch and the final head wall of ice (2 pitches).
Below, the bivy cave used by allthe early ascents up to 1980.
Below, theRibbon pitch.
Difficulty on this pitch depends on the amount of ice some what but more importantly what time you get there, the temps and how wet the ice is. This pitch caneasily be running with water and nothing but rotten ice.
You are looking at entirelast set of tiers in this picture. The three climbers at the right side of the ice are at the base of the Ribbon pitch in fat, lateFeb '10 conditions.
Parts of the the last longpitch (or two short pitches)are shown here on the last tier. Fixed anchors on the right with a decent belay platform and rap chains. Climber here is on the last bit of steep ice and generally the crux of the route.
The final short pitch to finish the climb..steeper than it looks and generally sun rotted ice by the time you get on it. Perfect finish to a great climb! Picture is taken for the chained belay anchor and rap point.
For shortened view of the last tier. Chains on the rock are climber's right with a good ledge,one small stepabove the climber in the picture. The belay becomes pretty obviouswhen you are there. More so than in thispicture.
Looking back down the final pitch just below the last set of rap chains. Incredible piece of ice!
The always terrifing, free hanging rap off the Pencil on the way down. And not always the easiest rap station to find in the dark if it has been snowing. My suggestion is when in doubt "follow the water course" into thegully. You want thethird one on the far right. From the upper tier you walk to the first station(fixed pins and tat) that are on the left wall (looking down) where it narrows and steepens. The second setare fixed pins and tat again, this timeon the right hand side of the gully when facing down hill. The wrong gullies start outmuch steeper than the correct rap line. If it seems too weird and scary go north a gully...or two. You want teh tird gull on the north side of the bench.
A wonderful climb to be done over and over again just for the fun of it!
Polar Circus topo courtesy of Joe Palma copyright 2007
Some chainachors were replaced and new ones installed in the spring/fall of
Dbl click to enlarge the topo and check out the rap line, depending on conditions and daylightif might be a little confusing first time up the route.
Another topo here worth looking at as well:
http://lamountaineers.org/NAC/browserf/climbs/polarcir/topo.pdf
Gear Notes:
These days all but the lastrap anchorare bolts, fixed chains or pins and tat. You will rap straight over the Pencil so be careful there of you or your rope knocking anything down. 70m ropes are really much easier but 60m ropes will work as well. Take some tat for V threads but make sure someone hasn't beat you to it already. V threads get burried quicky on the upper pitches where you might need them so come prepared.
Be really careful on the avi slop above the Pencil...it has been fatal. It has three sections, a right hand traverse, a left hand traverse and short up hill and a final long left hand traverse which is a good sized slope show in the pictures above. A slides here will dump debrisinto the canyon below the Pencil.
Avi danger in particular on this route can be very high. Even small slidescoming out of the upper bowl while on the last 3 tiers will be serious.
Worth a look at the photos here:
http://www.pc.gc.ca/eng/pn-np/ab/banff/visit/visit7a12/visit7a12c-3/Polar%20Circus.aspx
and no the photos arenot photo shopped.....
A dozen screws should be plenty for anyone capable of finishing the climb. In good conditions plan on anywhere from 5 to 3 roped pitches depending on the length of your rope and a lot of easy ice either soloed or climbed together.
A early start will get you off before the south facing avi slopes heat up. Or better yet do it on a snowy, cloudy and cold day. You can avoid the avi danger and soft, rotten ice on the crux pitch if you do without the sun. Don't forget 3 or 4 long screws just for that rotten ice late in the day.
8 or 9 hrs round trip, car to car, these days is a reasonable time with good ice and snow conditions. 5 or 6 hrs of climbing. A hook fest on hammered out ice will make it quicker. A lot of snow to break trail through or really cold, new ice canmake it a "slightly" longer day.There is a reason the climb is rated a V for over all grade and time.
Approach Notes:
On a good day 10 minutes up a boot packed trail from the road. Cowboy-up and start on the first easy ice available instead of walking up the snow slope to the left and beginning of the first WI4 pitch.
Subscribe to:
Comments (Atom)